The profile section of any application collects critical information associated with the user. It comes in handy if one can access their profile and update the information when needed. Here is a quick guide for accessing the ‘Profile’ Section on Angel One mobile application and modifying your profile details.
Points to Note
Individual account holder
- Mobile number, email ID and address can be updated online for individual accounts.
- The contact details update process takes 2-3 days to be updated and reflected in the account.
- Users can place a single request for an email address, mobile number and address updation.
- For email and mobile number updates, an OTP is required to verify the new updated mobile number and email address.
- Only an Aadhaar card is accepted as address proof, which is fetched from the digilocker for online address modification.
- Please have your Aadhaar card ready for an online request to e-sign the application.
- Ensure your Aadhaar card is linked to your mobile number to complete the process.
Joint account holder/ HUF account holder/ minor account holder/ NRI/ corporate account holder
- For modified contact details, you can raise a ticket here (Create Ticket —> Select Account Details under Category —> Select Profile Details under Sub-Category) and attach the filled-in account modification form along with valid proof.
- Once an email/mobile modification request has been placed, the support team will call you to verify it. Please make sure to take this call.
- For address verification, Aadhar card, Driving license, Voter ID card and Passport are accepted as valid proof.
- If you are a HUF account holder, the modification form requires Karta’s signature and HUF stamp.
- If you are a corporate account holder, a corporate stamp will be accepted in place of a signature. The signature must match our records. The last two months' bank statement of the corporate bank account is required as address proof.
- If you are a joint account holder, the bank statement from the last six months is accepted as address proof. The support team will contact you and verify the details.
- If it’s a minor’s account, the guardian’s signature is required.
- If you are an NRI Account holder, your passport will be required as address proof along with the Indian address proof.
Contact Details Update Process -
Step 1: Accessing the update contact details option:
- Use this link to access your contact details page
- Alternatively, log in to the Angel One app, go to the Accounts page, and click on the Profile Widget.
- Use your mobile number/client ID and OTP to login.


Step 2: Click on “Personal Details”.

Step 3: Click on the edit icon against the detail which needs to be updated - Phone, Email or Location.
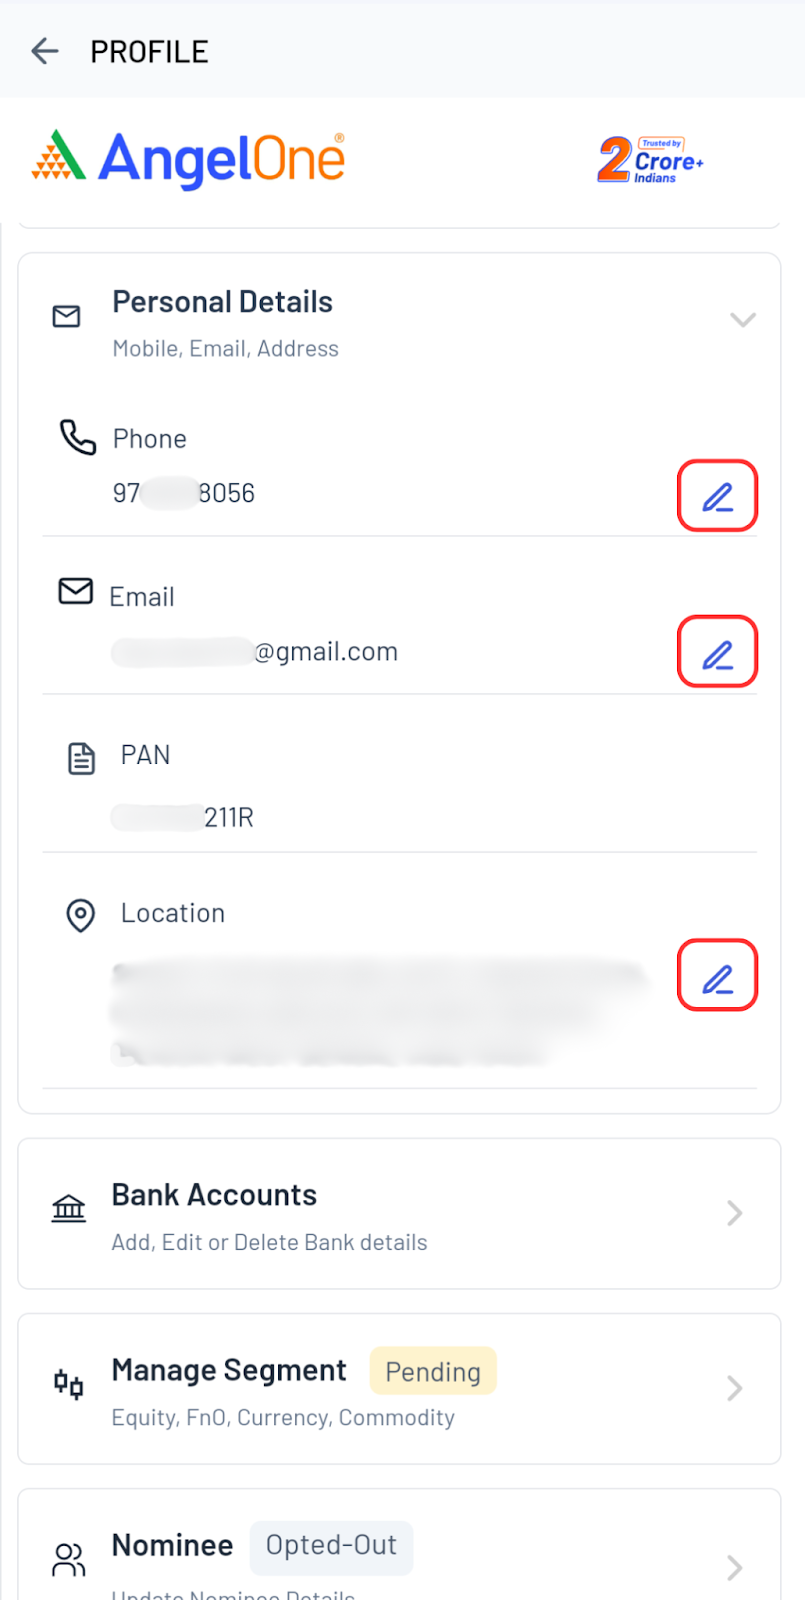
Update Mobile Details
Step 1: Use this link to access mobile modification page
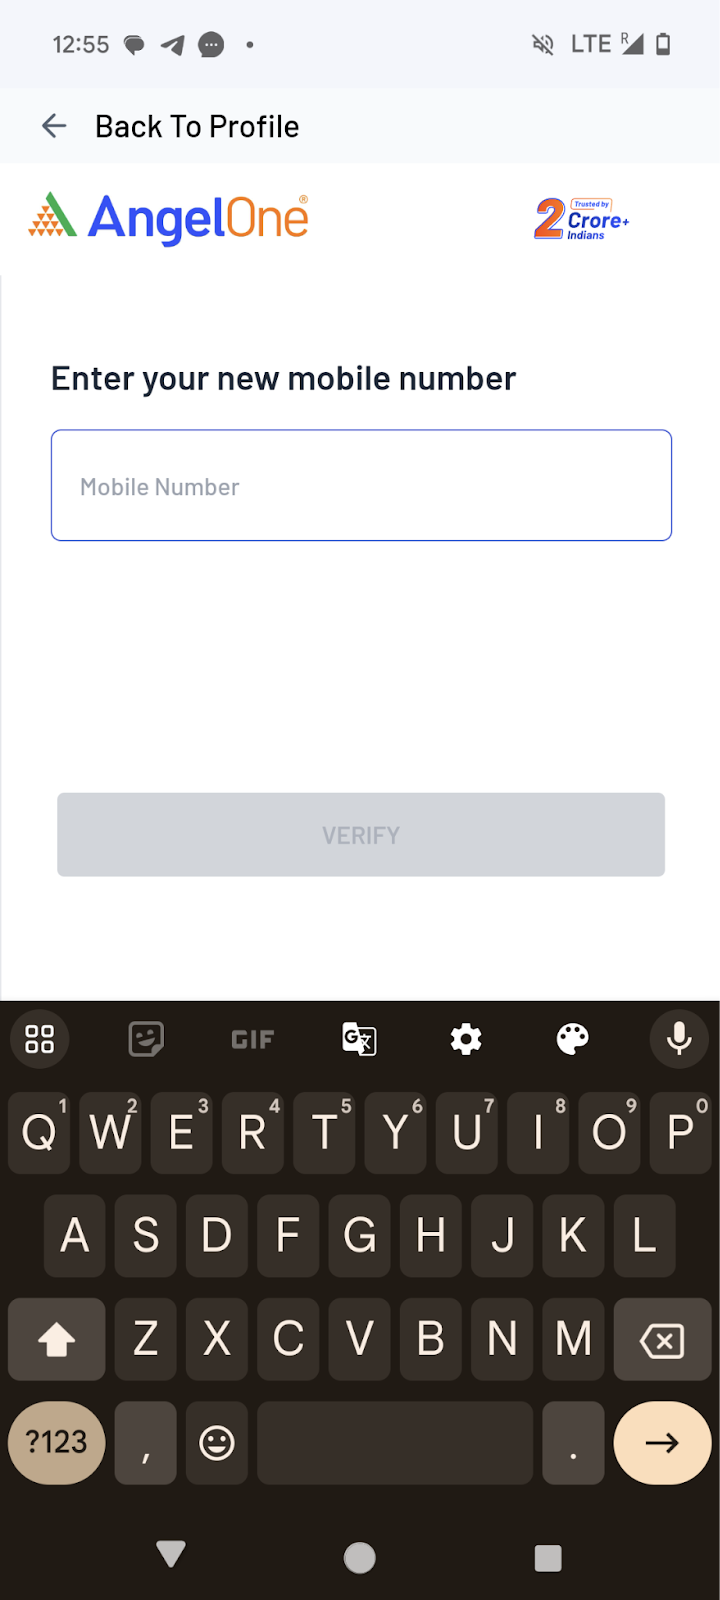
Step 2: Enter the new mobile number and click on verify.
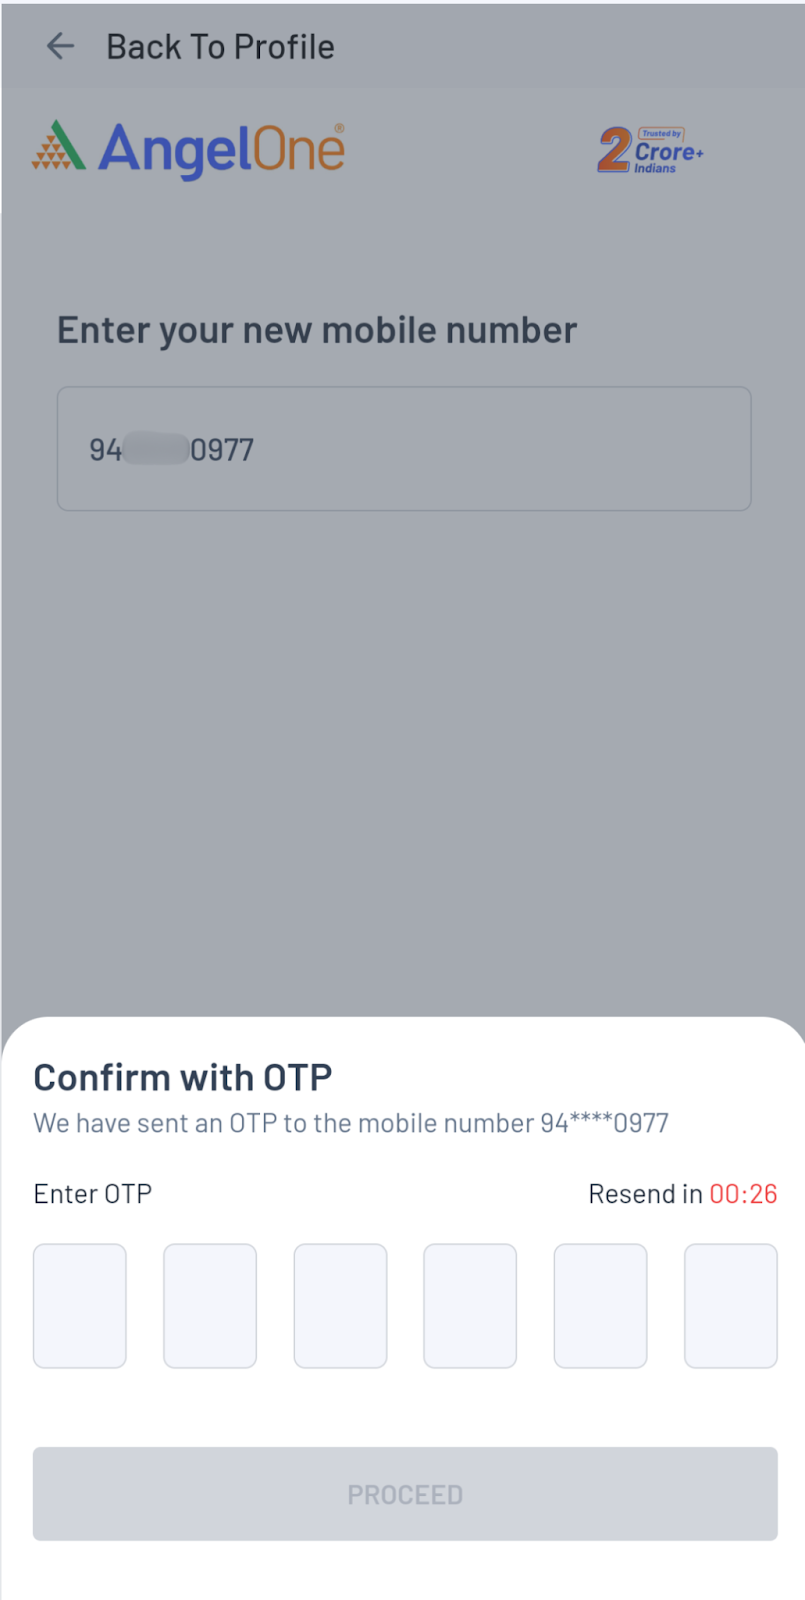
Step 3: Enter the OTP sent to the new mobile number and click on proceed.
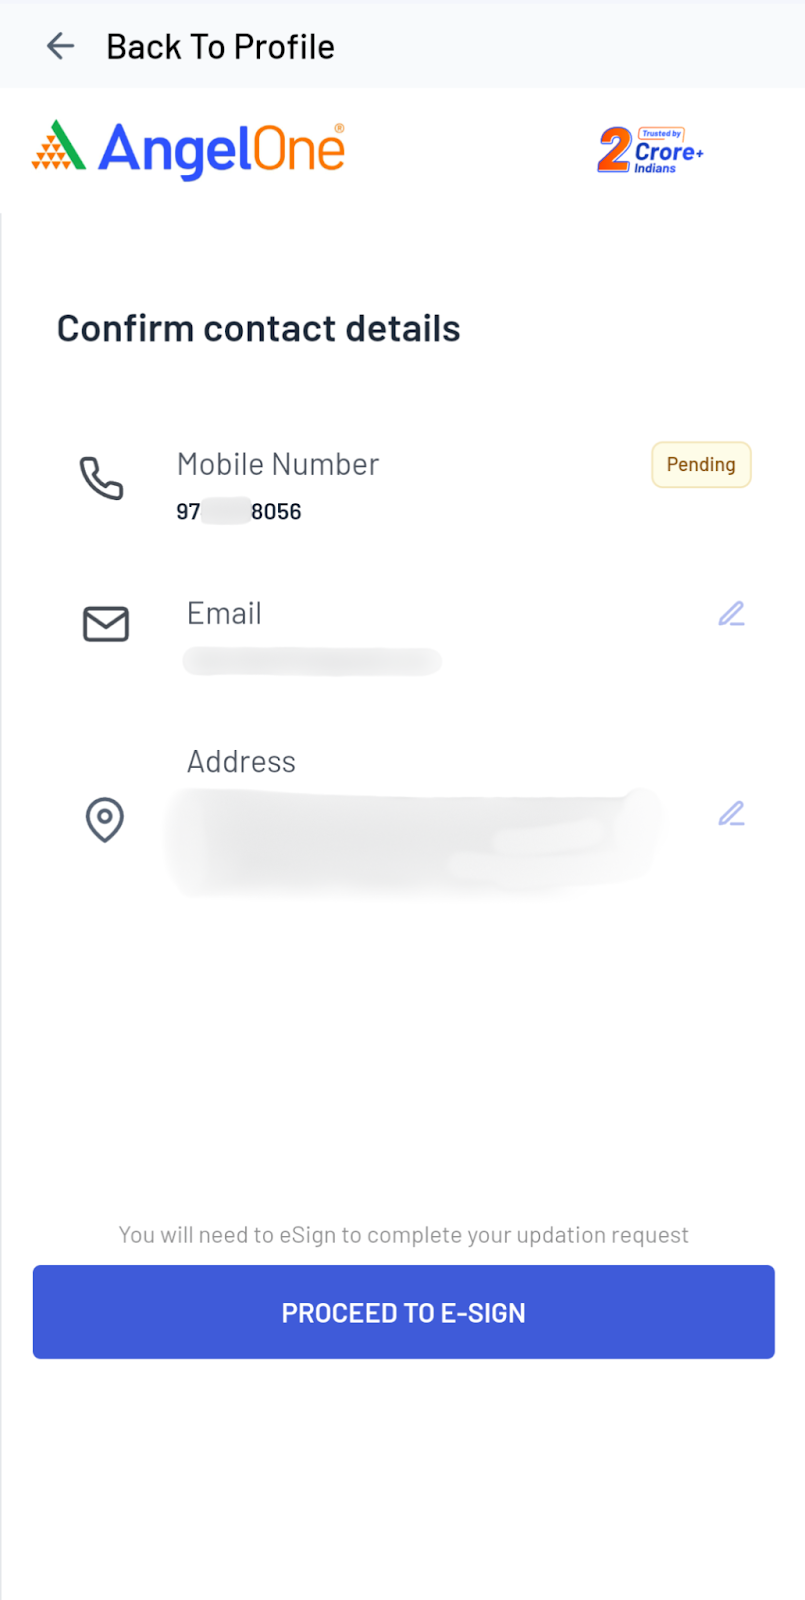
Step 4: You can update email and address as well if needed, before proceeding. If not needed then click on “proceed to e-sign”.
Step 5: You will be redirected for e-signing the request. Enter the Aadhar details & OTP sent from Adhaar on your mobile number
- Make sure to use your own aadhar card for e-signing.


Step 6: The request will be processed in 2-3 working days.

Update Email address
Step 1: Use this link to access email modification.

Step 2: Enter the new email address and click on verify.
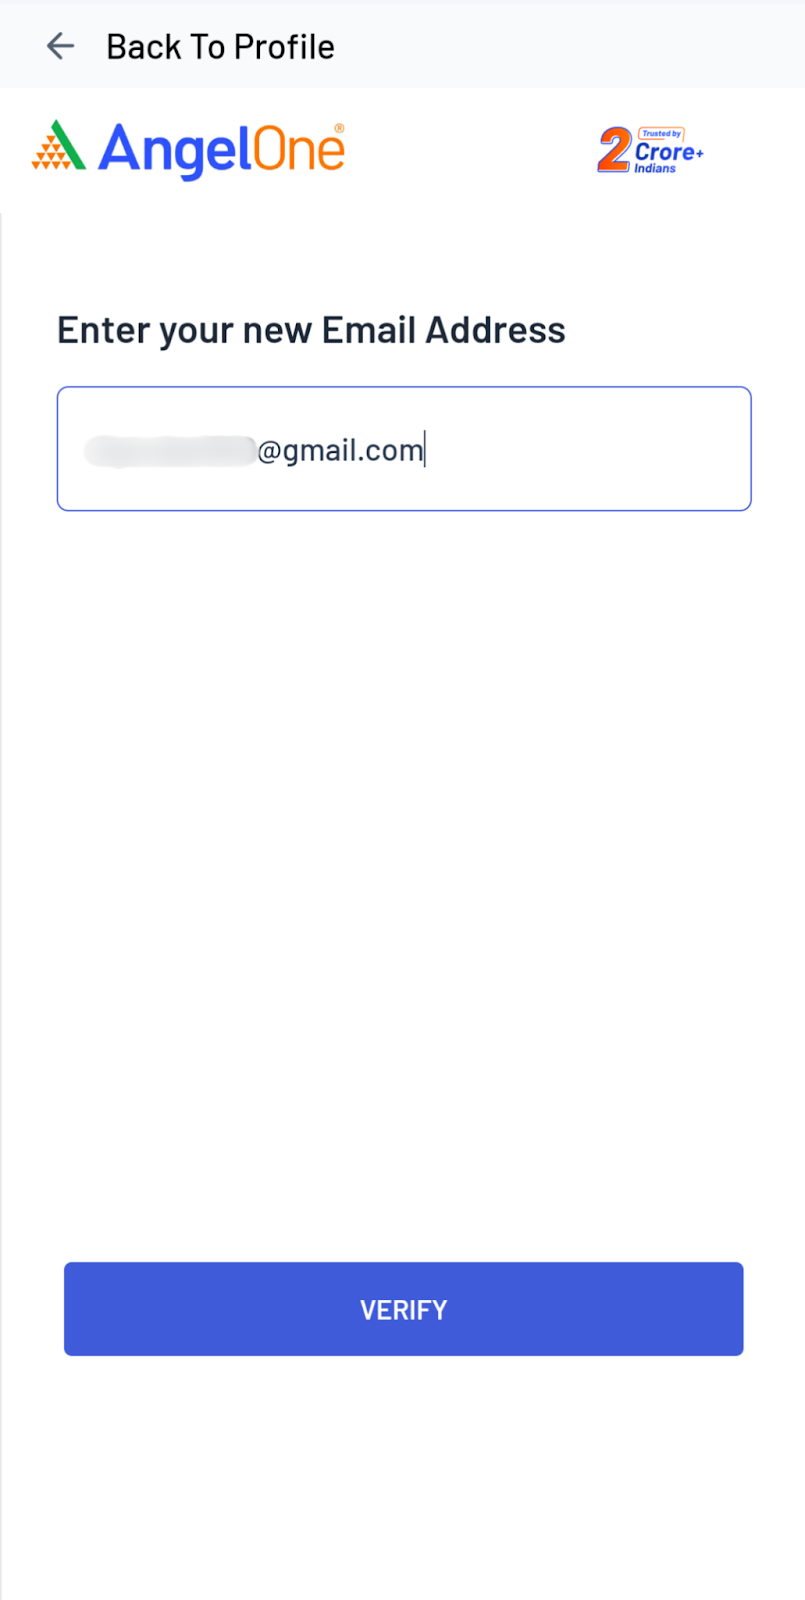
Step 3: Enter the OTP sent to the new email id and click on proceed.
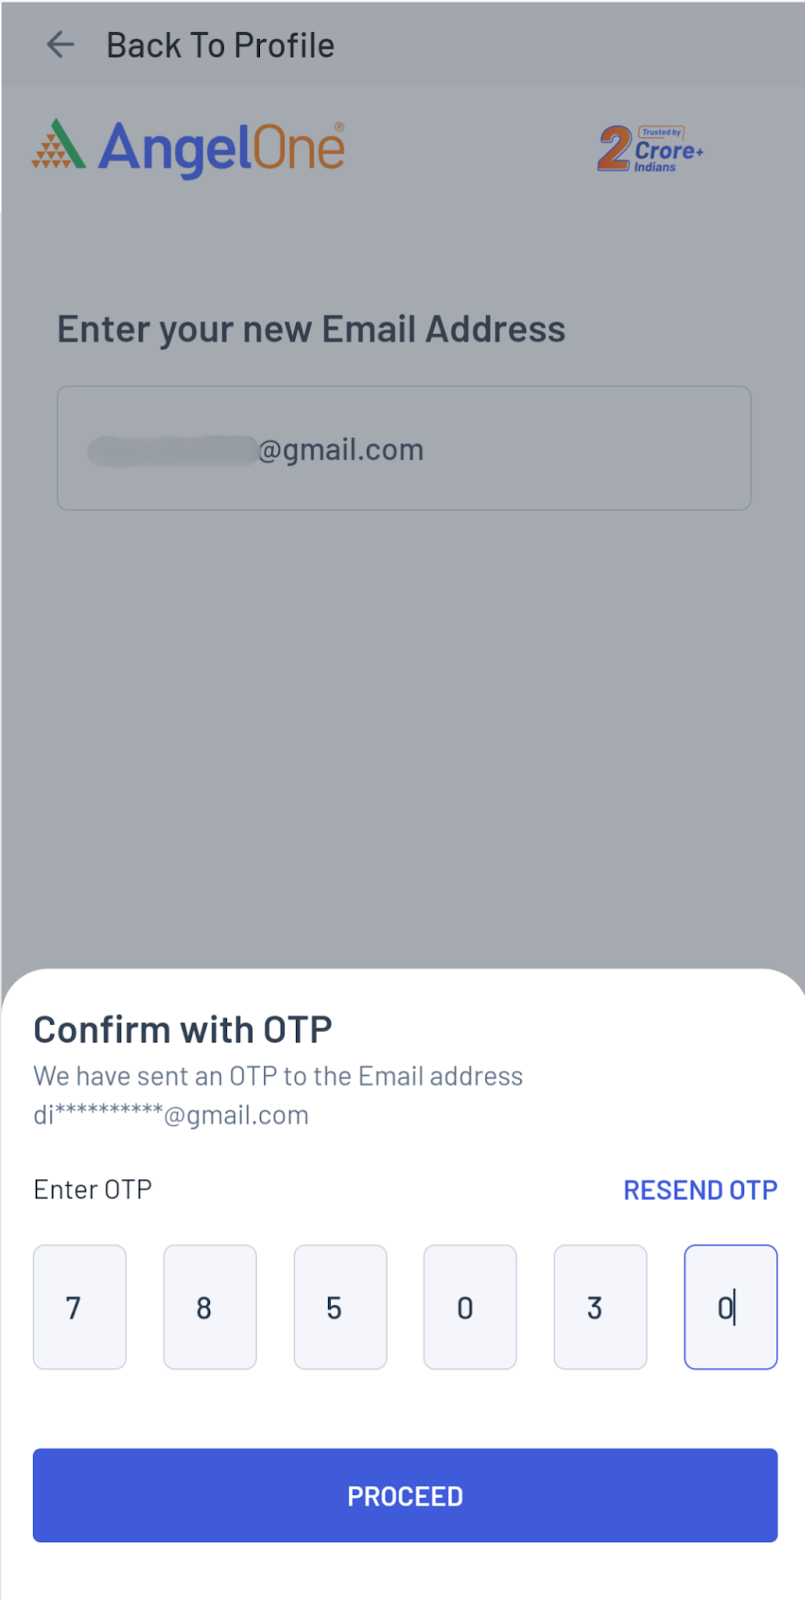
Step 4: You can update mobile number and address as well if needed, before proceeding. If not needed then click on “proceed to e-sign”.
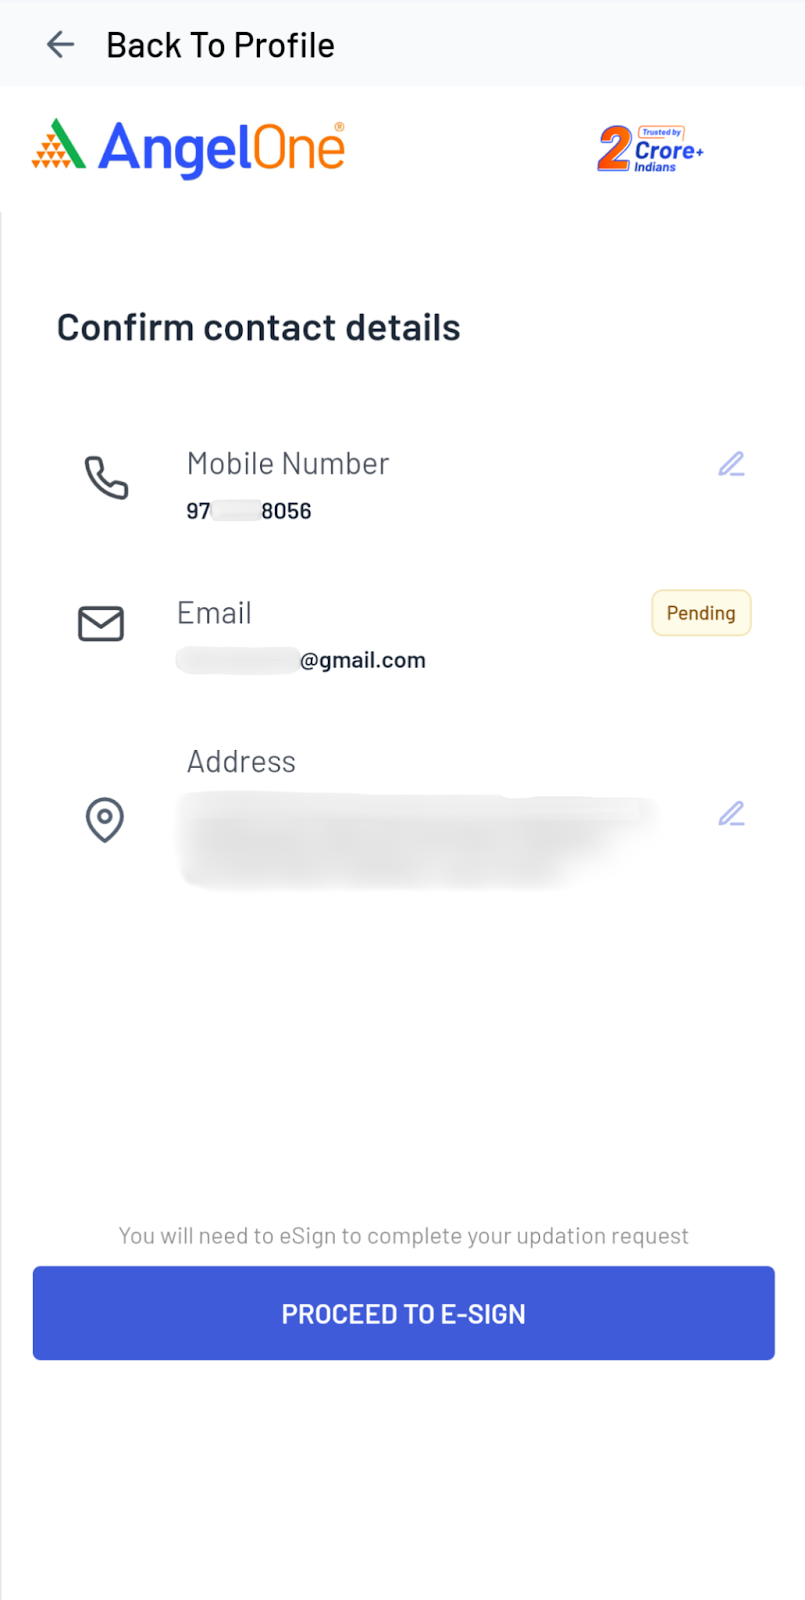
Step 5: You will be redirected for e-signing the request. Enter the Aadhar details & OTP sent from Adhaar on your mobile number
- Make sure to use your own aadhar card for e-signing.


Step 6: The request will be processed in 2-3 working days.

Update Address
Step 1: Use this link to access the address change request.
Step 2: Your aadhar will be fetched from digilocker as a proof of address. Click on okay to automatically fetch Aadhar details from digilocker.
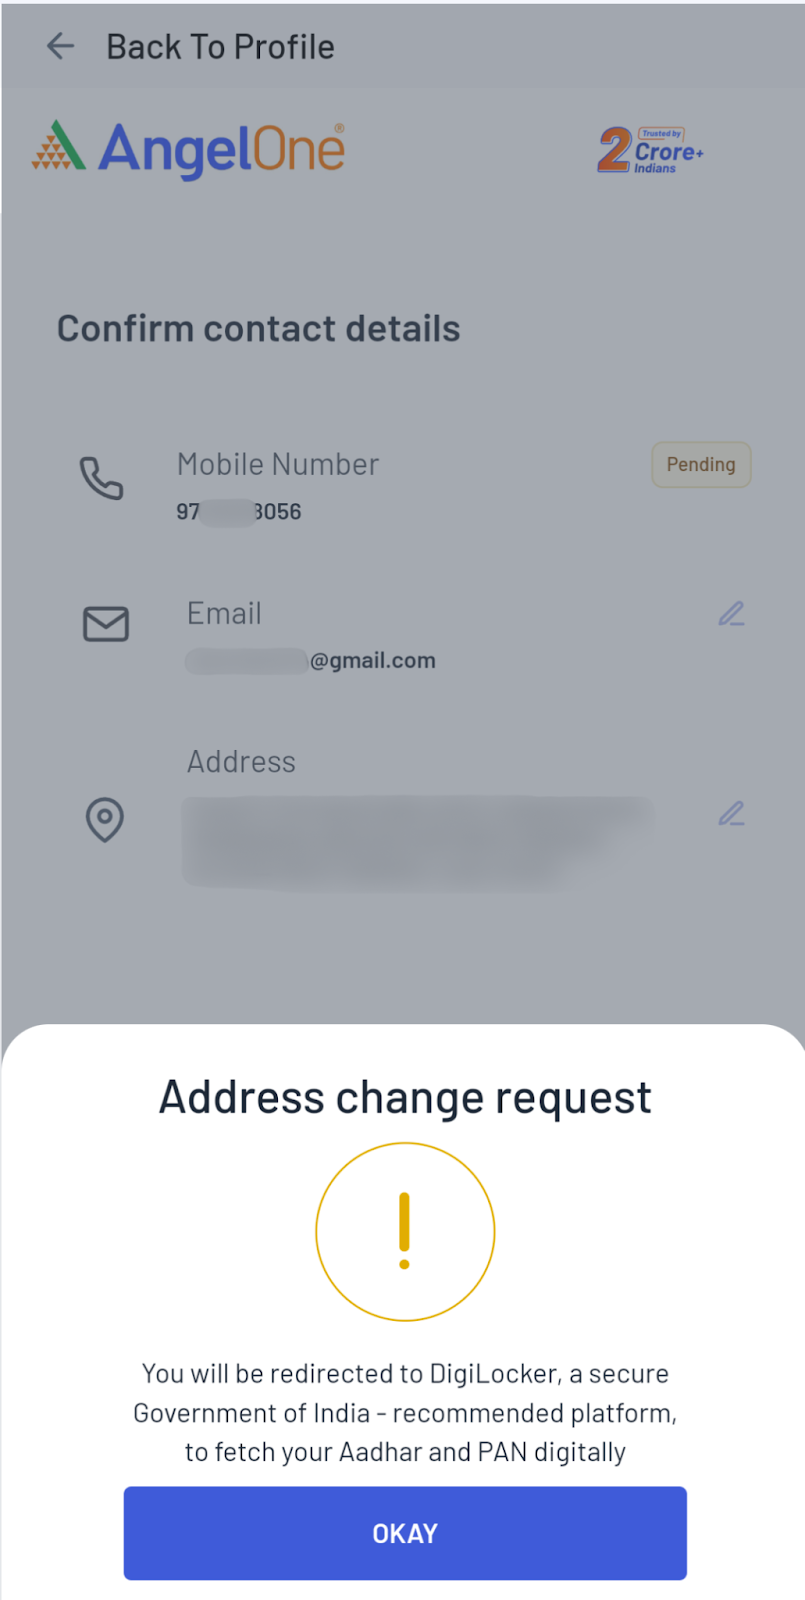
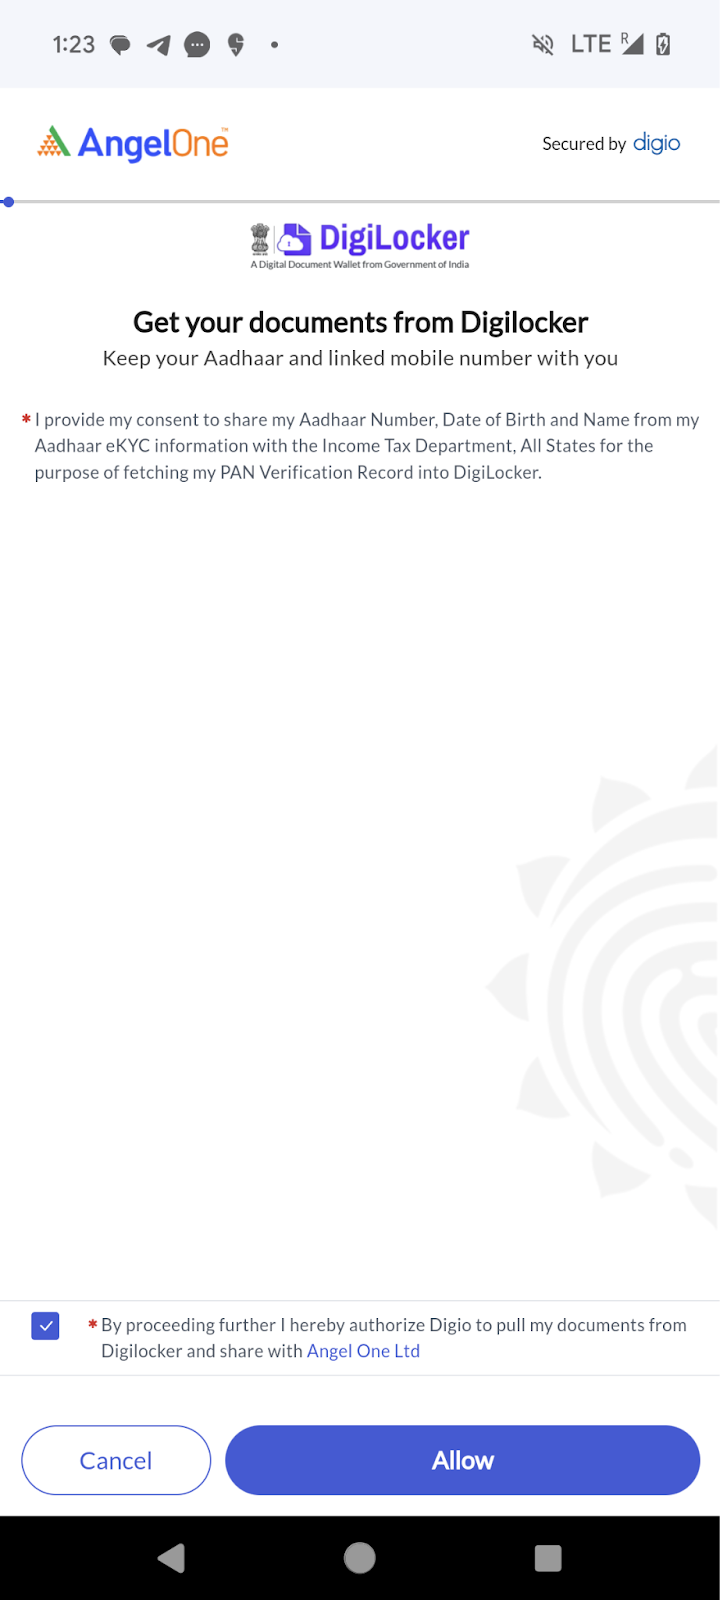
Step 3: You will be redirected to the digilocker page. Click on “Allow”.
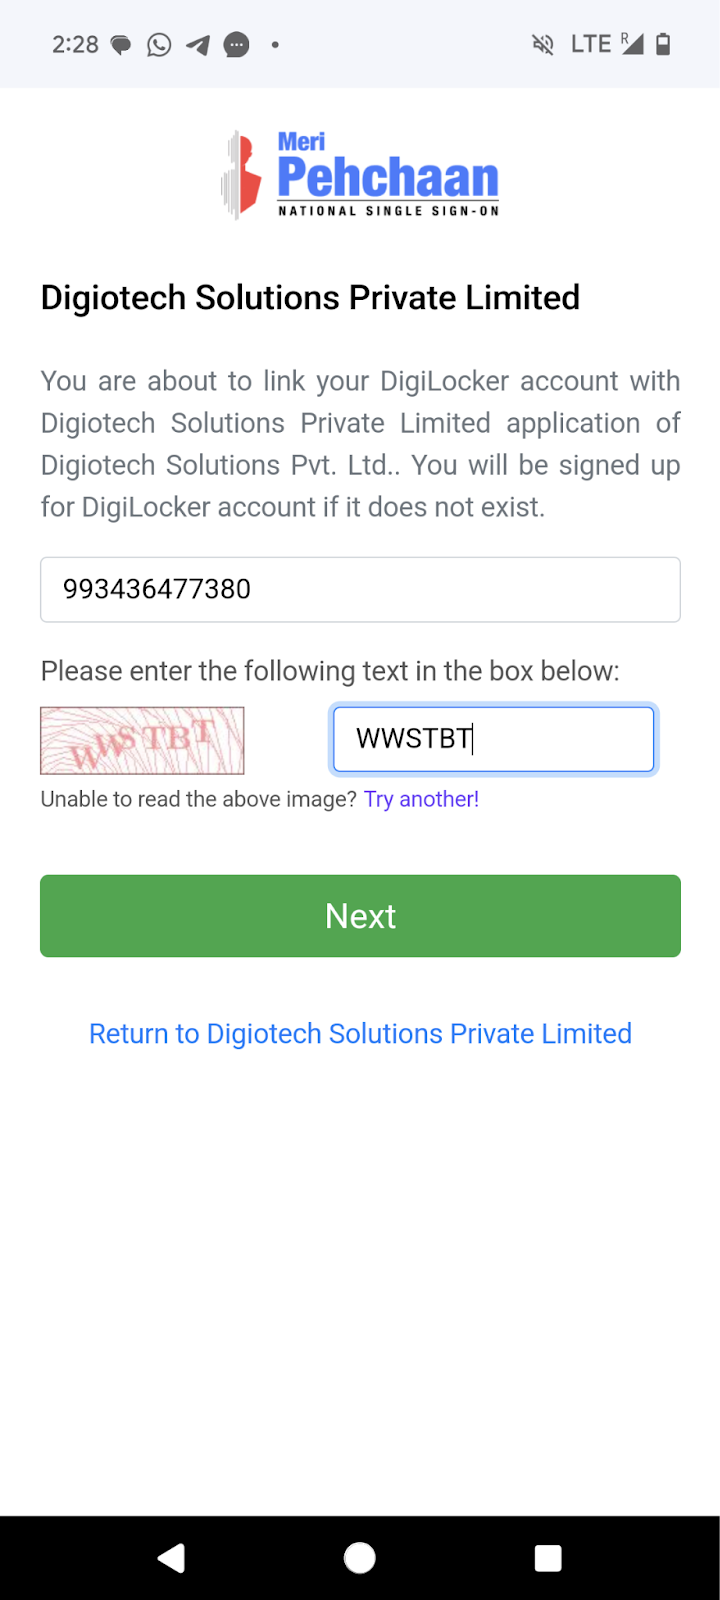
Step 4: Enter your Aadhaar details and click on next.
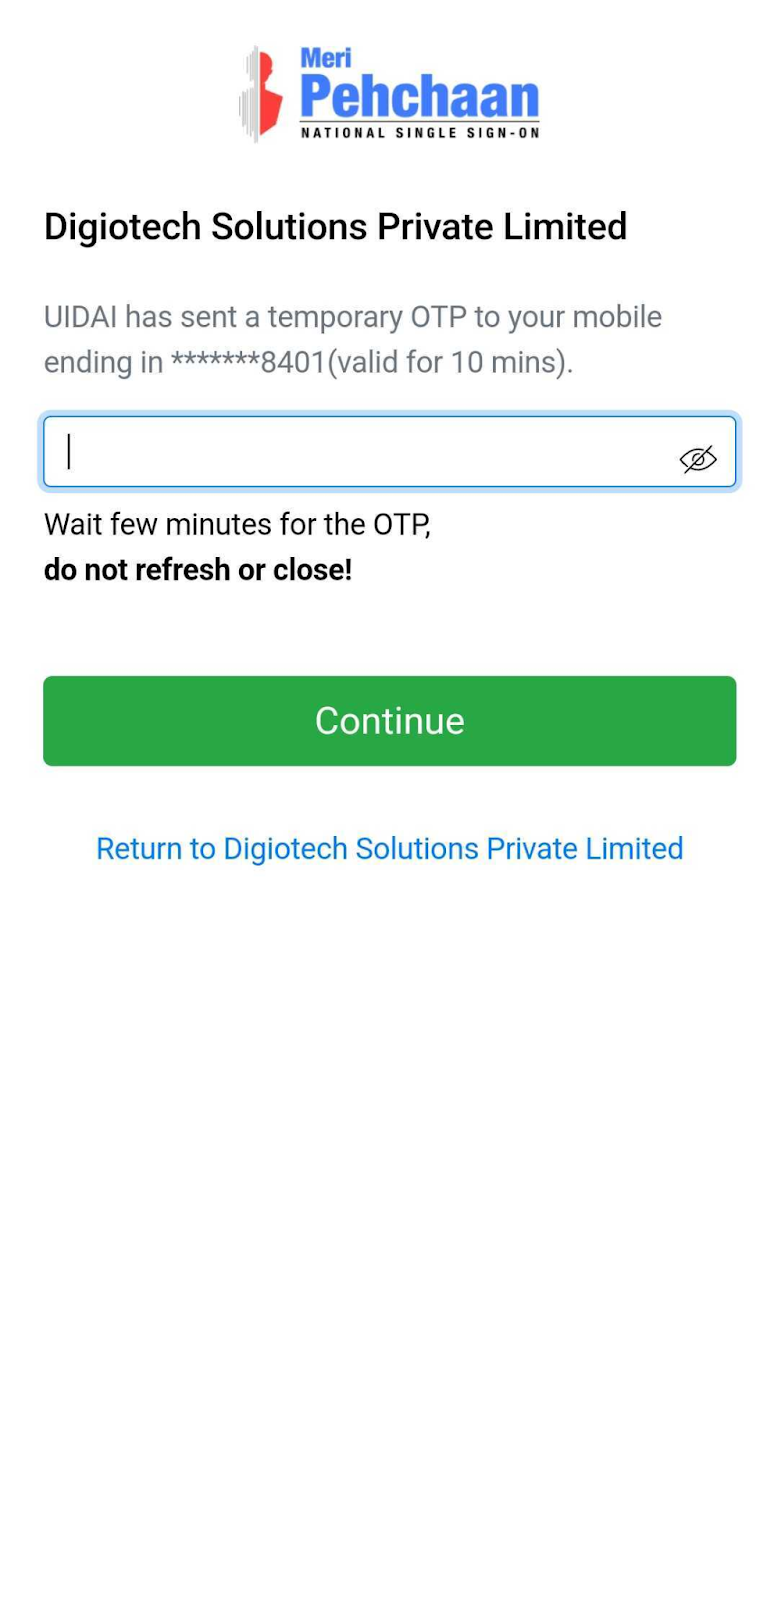
Step 5: Enter the OTP sent to the mobile number linked to your Aadhaar card.
Step 6: Enter your DigiLocker Security Pin.

Step 7: Allow consent to automatically fetch details.
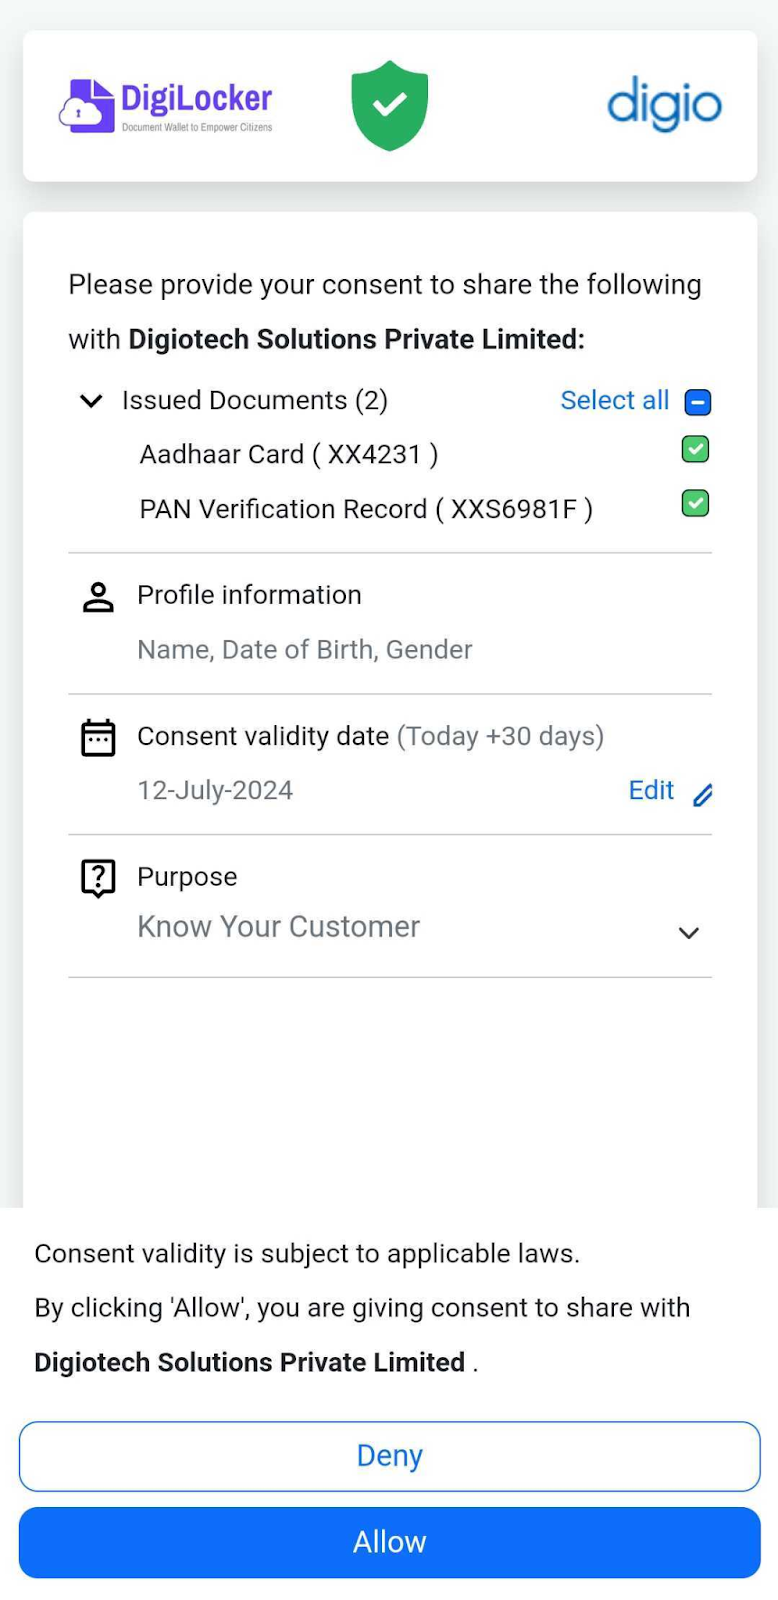
Step 8: You can update mobile number and email address as well if needed, before proceeding. If not needed then click on “proceed to e-sign”.
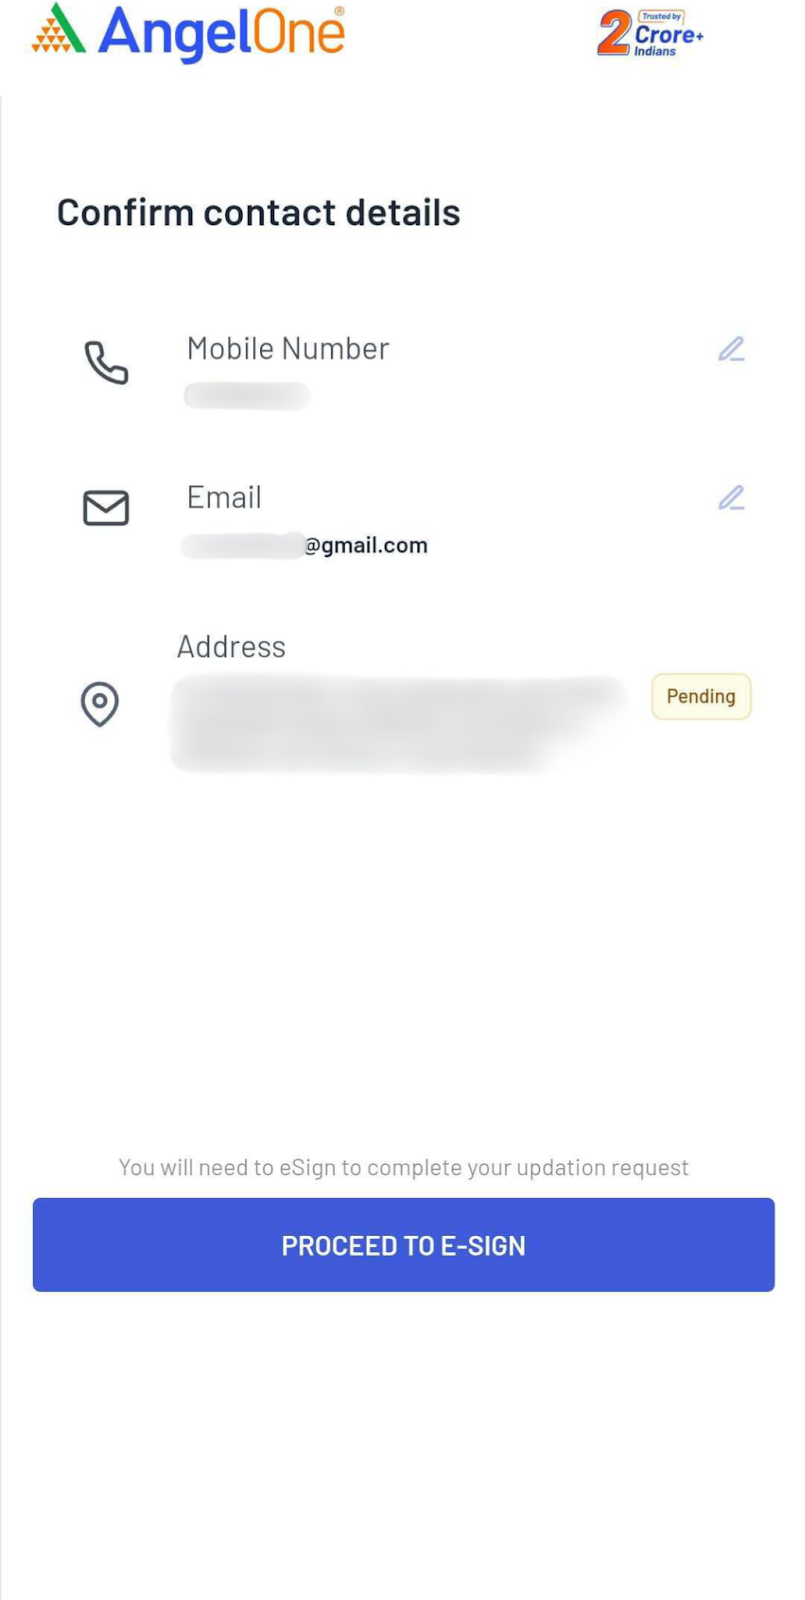
Step 9: You will be redirected for e-signing the request. Enter the Aadhar details & OTP sent from Adhaar on your mobile number
- Make sure to use your own aadhar card for e-signing.


Step 10: The request will be processed in 2-3 working days.

How to Add a New Bank Account to Your Angel One Profile?
Individual account holder
- If you are an individual account holder, you can update your bank details online using this link through Angel One App.
- The new bank account being added through the online process will automatically become your primary bank account. This means that any SEBI Payouts or automated fund settlements and dividends will be received in the primary bank account.
- Through the online process, you can add a new bank account or update the IFSC code (branch) of the existing bank account.
- The account being added must belong to the same person as the Angel account holder.
- You can add up to 5 bank accounts.
- If auto-verification of the bank account fails, a cancelled cheque needs to be uploaded for verification.
- Please have your Aadhaar card ready when requesting to e-sign the application online.
- Ensure your Aadhaar card is linked to your mobile number to complete the process.
Joint account holder/ HUF account holder/ minor account holder/ NRI/ corporate account holder
- To update your bank details, you can raise a ticket here (Create Ticket —> Select Account Details under Category —> Select Profile Details under Sub-Category) and attach the filled-in bank modification form with relevant proof.
- Any of the documents from the below-mentioned list are accepted as valid bank proof -
- Bank account statement
- The front page should clearly show the client's name, account number, IFSC code, and Micr code.
- Passbook
- The front page with the client's name, account number, IFSC code and MICR code should be clearly visible.
- Canceled cheque
- If you are an HUF account holder, Karta’s signature and stamp are required. The bank proof must be in the name of the Karta, and only a HUF bank account can be added.
- If you are a joint account holder, the form will require the signature of all holders. The bank account and proof must be in the name of the first account holder. Both joint and individual accounts of the first account holder can be added as new bank accounts.
- If you are a corporate account holder, an authorized signatory signature and stamp are required. The bank modification form and proof are mandatory.
- If it’s a minor’s account, the minor's bank account and guardian’s signature are required.
- If it’s an NRI account, then the bank modification form and proof is mandatory. Only Indian bank proof with NRE and NRO categories will be acceptable.
Process to Modify Bank Account Online
Step 1. Accessing the Bank Accounts option:
- Use this link to update your bank details.
- Alternatively, log in to the Angel One app, go to the Accounts page, and click on the Profile Widget.
- Use your mobile number/client ID and OTP to log in.


Step 2. Click on “Bank Accounts”.

Adding a new Bank Account
Step 1. Click on Add Bank Account

Step 2. Enter the new bank account number and IFSC code
Please make sure to add the bank account registered with Angel One account holder only

Step 3. Check if the branch name is correct and click on continue

Step 4. Automatic Bank account verification will be tried and you will be redirected to the e-sign page if verification is successful

Step 5. In case the verification fails, you will get an option to either upload a cancelled cheque or try another bank

Step 6. Upload the canceled cheque and proceed to e-sign

Step 7. You will be redirected for esigning the request. Enter the Aadhaar details & OTP sent from Aadhaar on your mobile number
- Make sure to use your own aadhaar card for e-signing.


Step 8. The request will be processed in 2-3 working days.

Editing a Bank Account
Step 1. Upon clicking "Bank Details," all linked bank accounts will be displayed.

Step 2. Click on the 3 dots icon against the bank you wish to modify and click on edit.

Step 3. Enter the IFSC Code and click on continue

Step 4. Automatic Bank account verification will be tried and you will be redirected to the e-sign page if verification is successful

Step 5. In case the verification fails, you will get an option to either upload a cancelled cheque or try another bank

Step 6. You will be redirected for e-signing the request. Enter the Aadhaar details & OTP sent from Aadhaar on your mobile number
- Make sure to use your own aadhaar card for e-signing


Step 7. The request will be processed in 2-3 working days.

How to activate a segment?
You can see the active segments under the ‘Manage Segments’ section on your profile page or by using this link. If you wish to activate any product segment on your Angel One trading account, you can easily do it with just a few clicks through the ‘Profile’ Section on the Angel One mobile app. Click here to know how to activate a segment on the Angel One app.
Conclusion
If you have any further queries or suggestions regarding the profile modification process or any other feature of the Angel One app, join our Angel One Community Page and post your concerns there.

